Quick Start
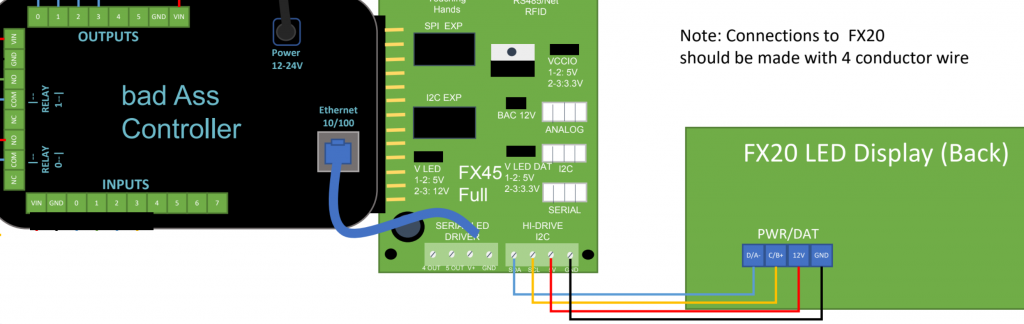
To connect the FX20 to your BAC V:
- Disconnect power from your BAC V.
- Install the FX45 expansion board to the expansion slot on your BAC V.
- Connect the FX20 to the FX45 as shown.
- We strongly recommend using twisted pair wiring, like CAT5e or CAT6, for connections to the FX20. Make each connection with both wires of a twisted pair. (In other words, strip both the colored wire and the striped colored/white wire it is twisted with inside the cable, then connect the ends together to create a single wire with noise cancellation properties for longer runs.)
- Set J2 on the FX45 to connect pins 2 and 3 (12V). This setting will provide the correct 12V power to the FX20 from the “Hi-Drive I2C connector”. Ensure the power is not connected to the BAC while performing this step.
- Double-check your wiring, then power up the BAC and test your configuration. Refer to the documentation below for commands you can use from a custom event or for instructions on synchronizing your timer with M3.
Specifications
| Input Voltage | 12V DC |
| Display Characters | Red, 2.3″ Tall. Other colors available. |
M3 Synchronization Setup
To setup a synchronized timer with M3:
- Ensure your BAC is updated to the most recent firmware version, 1.9.4 or later.
- Locate an event that occurs on your BAC before your game begins. We recommend the ‘Init’ action for this purpose.
- Add a “Set FX20 Action” to this event
- For the command, enter:
1.m3TimerSet.roomname
where 1 is the number of your FX20 (most people with only one FX20 will select 1) and where roomname is the name of your story in M3 (for example, THM).
This command is case sensitive, so make sure to capitalize both the command and your story name correctly.
Command Reference
The following commands for manual control of the FX20 can be used from any custom event in BAM.
For all commands, the command format is:
{FX20 Number}.{command}.{parameters}
The first FX20 you connect is number 1, so for most users these commands will all begin with 1. (To use multiple FX20s, contact ERT for custom configuration steps.)
All commands are case sensitive.
| Command | Description | Parameter(s) | Example |
| text | Sets the text displayed on the display | Text to display, up to 4 digits. | 1.text.1234 |
| brightness | Sets the brightness of the display | The brightness to set the display to, expressed as an integer from 0 (off) to 255 (brightest). | 1.brightness.128 |
| timerSet | Sets a specific value for the timer. | Sets the total value of the timer in milliseconds. | 0.timerSet.3600000 Sets the timer to 60 minutes (60 min * 60 sec/min * 1000 ms/sec = 3600000) |
| timerPlay | Starts or resumes the timer. | None | 1.timerPlay |
| timerPause | Pauses the timer. | None | 1.timerPause |
| timerReset | Stops the timer and resets it to its initial value. | None | 1.timerReset |
| timerDirection | Determines if the timer counts down or up. | One of the following two words, all lower case: up down | 1.timerDirection.down |
| timerSpeed | Sets the speed at which the timer counts. | A speed, expressed as a decimal that is a multiplier to actual elapsed wall clock time. To set speed to actual clock time, set this to 1.0 To elapse time twice as fast as in real life, set to 2.0 (for example, 60 seconds on the clock is 30 seconds in real life). To elapse half as fast as in real life, set to 1.5. (for example, 60 seconds on the clock is 120 seconds in real life.) (The actual calculations are done at the millisecond level, so even fractional speeds will appear smooth to players.) | 1.timerSpeed.1.0 |
| timerEnd | Ends the timer by consuming all remaining time on the timer, resulting in 0 seconds remaining. | None | 1.timerEnd |
| clear | Clears the display and displays nothing. | None | 1.clear |
| m3TimerSet | Synchronizes the FX20 timer with an M3 story’s timer. | roomName the name of the story in M3 that the timer should be synchronized with. | 1.m3TimerSet.THM Synchronizes the timer with the “THM” story/room. |