Whether you’re building a game in an engine like Unity, or just creating a straightforward custom app for your experience with Windows Forms or WPF, integrating an Escape Room Techs controller may seem daunting at first. By adopting MQTT, a popular realtime protocol for connected devices, you can add hardware support quickly and easily to your application!
What you’ll need:
- An Escape Room Techs BAC V controller, connected to your local network. If you don’t have one yet, visit our store.
- Visual Studio or Visual Studio Code – you can use any editor, but the Visual Studio platforms tend to provide the easiest development experience for C#-based projects.
- An always-on MQTT server for the controller to connect to. This is typically an always-on Windows PC or a small embedded computer like a Raspberry Pi; either usually runs Mosquitto, a popular MQTT server package from the Eclipse Foundation.
Setup Steps:
- 1: Install and configure Mosquitto, the MQTT server
- 2: Determine your IP address, and set up a static reservation.
- 3: Verify your MQTT server works with MQTT Explorer
- 4: Set up your BAC to connect to your server
- 5: Add MQTT support to your C# application
Step 1: Install and configure Mosqutto, the MQTT server
If running on a Raspberry Pi: follow the installation and configuration steps at https://randomnerdtutorials.com/how-to-install-mosquitto-broker-on-raspberry-pi/
If running on a Windows PC:
- Download Mosquitto from https://mosquitto.org/download/
- Open the downloaded installer and follow the onscreen instructions.
- When prompted, ensure “Service” is checked, which installs Mosquitto as a background service that will run automatically when your computer starts.

- Complete the setup process.
The next step is to enable access to Mosquitto. (By default, it installs in a secure configuration that blocks incoming connections.)
In many immersive entertainment installations, Mosquitto is running on a private local network that’s behind a firewall or router, so the simplest practice is to open anonymous access to the server so any computer or controller on the network can access it. For the purposes of this guide, we’ll use that configuration.
If your network may not be fully private and secured, refer to the Mosquitto documentation for instructions on setting up a username and password system instead. You are responsible for ensuring the security of your game network.
- From your Start menu, search for
notepadand find it in the list. Right-click the app and choose Run as administrator. (This is necessary to edit the Mosquitto configuration file, which is in a location shared across all users of your computer.)

- Approve the security prompt.
- From the File menu, choose Open. Enter the file path to the configuration file:
%programfiles%\mosquitto\mosquitto.conf
and then click Open. - Search the file for the security setting “allow_anonymous”.

Remove the # from the bottom line, and change it to read:
allow_anonymous true
When you’re done, the file should look like this:

Next, you’ll need to add at least one “listener” so external devices can connect. Search for #listener to find the correct location in the file:
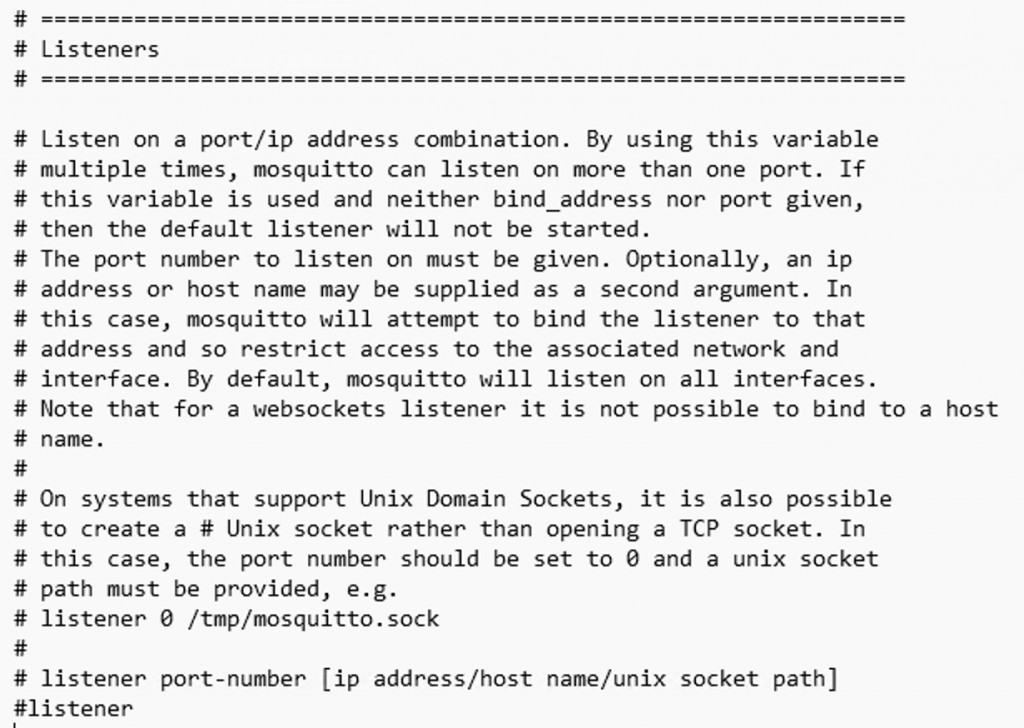
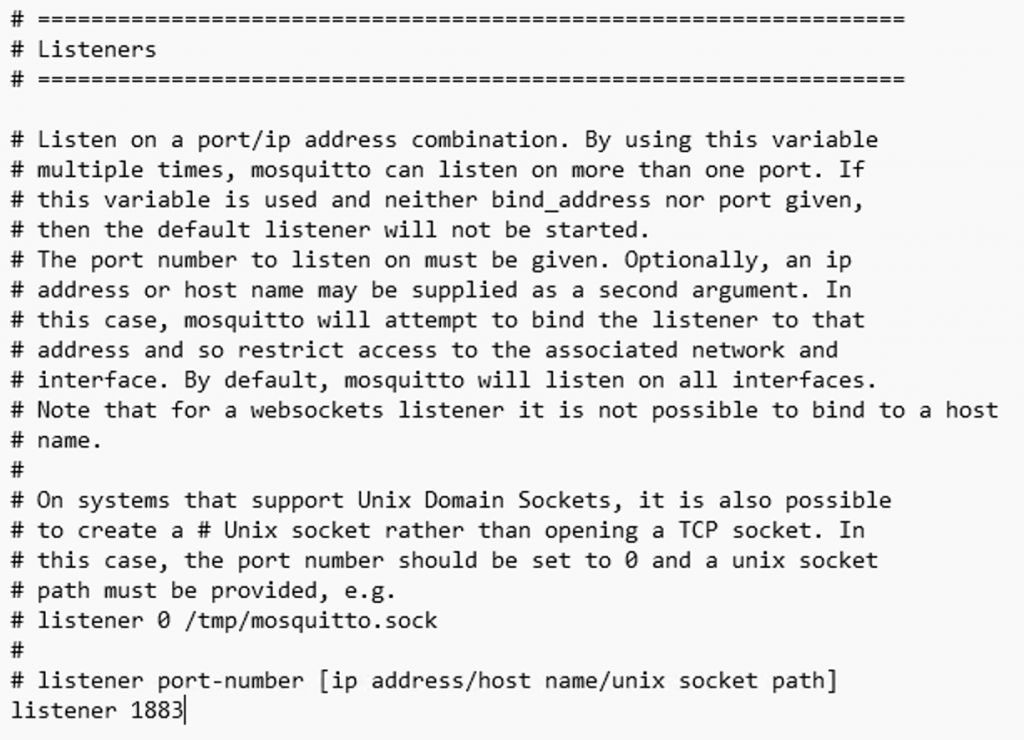
As before, remove the # before listener, and change it to read listener 1883
Save your changes, and close Notepad.
- Finally, restart the Mosquitto service to load the new changes. From the Start menu, search for
services.mscand open the Services management console.

From the Services console, scroll down and find “Mosquitto Broker” in the list. Right-click it to open the context menu. If the service isn’t already running, choose Start; if it is running, choose Restart.

Watch the status update to ensure the Mosquitto Broker is “Running”, then close the Services manager.
Tip: While you’re here, you can also change the startup type to “Automatic” (starts every time the computer starts), “Manual” (starts only when you explicitly start it from the Services console), or “Disabled” (never starts). It should be set to Automatic for most installations, and that’s usually the default.
- Finally, let’s make a firewall exception for Mosquitto so we can reach it from other computers. From Start, search for “Allow An App Through Windows Firewall”.

- Click the Change Settings button to allow access to the firewall settings, and authenticate if necessary.
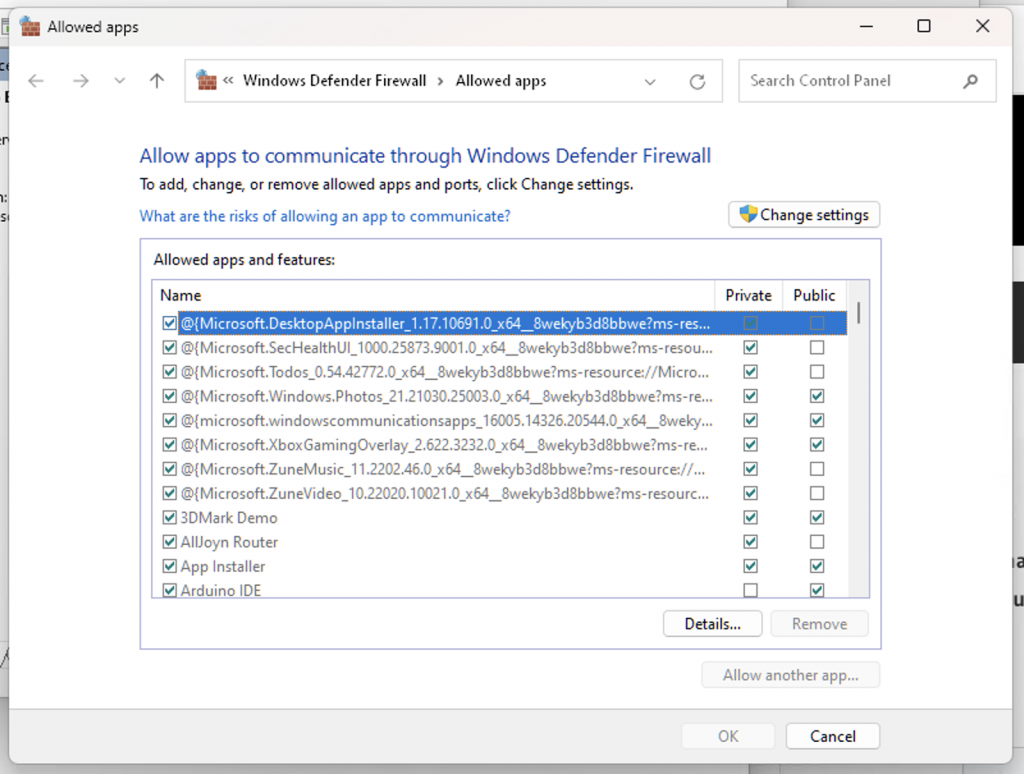
- Click “Allow another app…”

Choose Browse, and select%programfiles%\mosquitto\mosquitto.exe
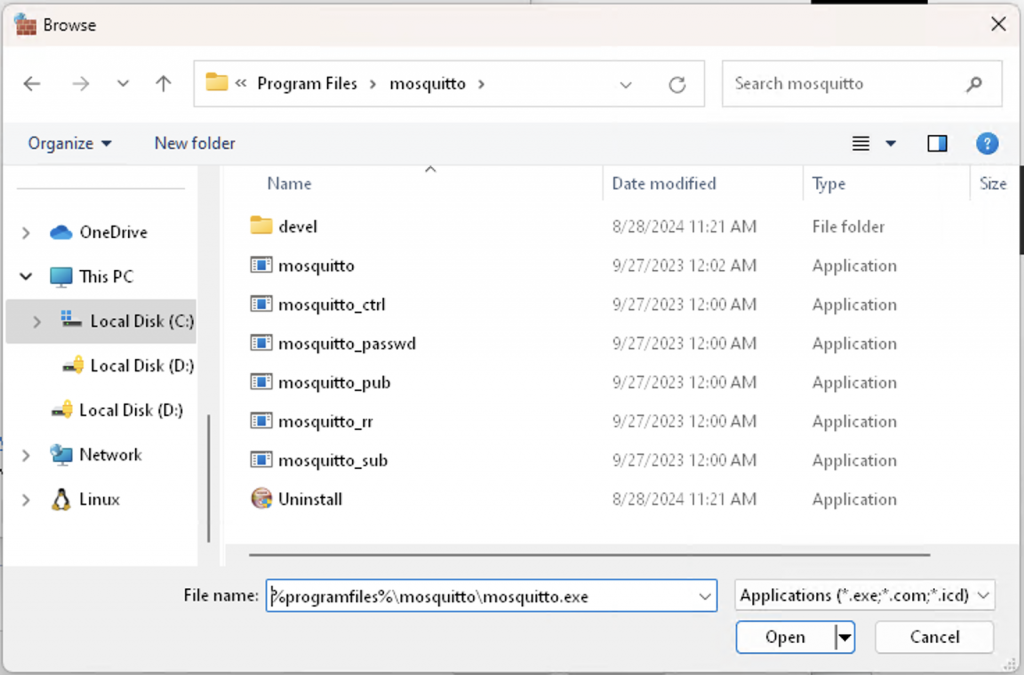
If you encounter problems, you may want to click “Network types…” and allow access on both Public and Private network types to maximize permitted connectivity. Windows doesn’t always label your networks accurately, and you can encounter problems with connection if the wrong label is picked – and sometimes labels can change unexpectedly if a new router, driver or update is installed.
Allowing Public is probably best for a private installation in a closed-loop game network. But if you’re setting this up on a mobile laptop, Mosquitto would be accessible while you’re using public Wi-Fi, so Private only is likely better in that scenario.

Finally, click Add and verify that the new Mosquitto exemption appears in the list, then close the settings page.
Step 2: Determine your IP address, and set up a static reservation.
Before you can connect to your Mosquitto installation, you need to know the IP address assigned to your computer.
IP addresses are, by default, assigned automatically by your router, which means they can change regularly. This can cause your game to randomly stop working at the worst possible time, so it’s best to ensure the router has a special instruction to always give your computer the same IP address when you connect.
Setting this up is typically done using your router’s configuration web page. You’re looking for a setting named “static IP address”, “IP reservation”, “fixed lease”, “DHCP reservation” or something similar; it’s often found from the “Connected clients” list, in Advanced settings, or in a page labeled DHCP.
Unfortunately, every router is different – for detailed instructions, refer to your router’s manual, or reach out to us for assistance if you get stuck.
When assigning a static IP, you can either set your computer to permanently use the same address it already has, or you can assign a nice round number that’s memorable and convenient if it isn’t already in use elsewhere on the network. (For example, some people like to use .100 for their server, so if your network subnet is 192.168.1.x, the resulting IP would be 192.168.1.100.)
If you do assign a different IP address, make sure to restart your computer to ensure it picks up the new address.
If you’re having trouble determining your IP address, you can always find it through Windows:
- From the Settings app, open “Network and Internet”
- At the top of the screen, click Properties for your main network connection
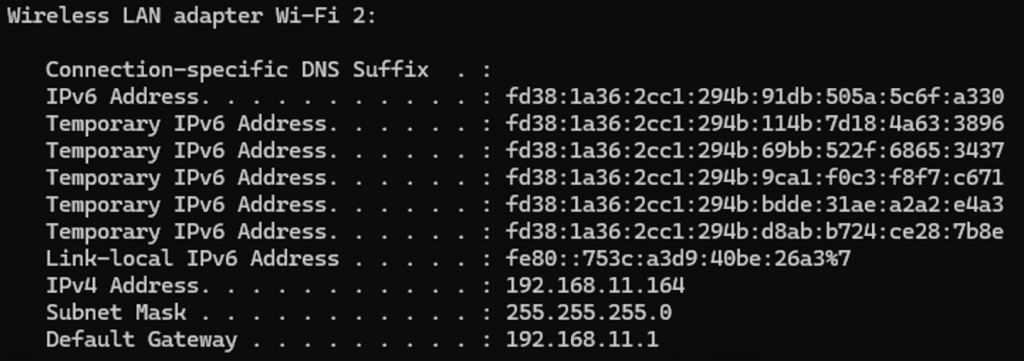
- Scroll down and find the IPv4 address in the properties list. For this example, our computer has the IP address of 192.168.11.164, but yours will be different.

You can also use a command line to find the IP address. Open Command Prompt, then type ipconfig and press enter. You’ll see a summary of all your network cards, with the “IPv4 Address” clearly indicated for each:
Step 3: Verify your Mosquitto installation was successful using MQTT Explorer
MQTT Explorer is a useful tool to familiarize yourself with how Mosquitto works! Let’s install it and connect to your server to verify everything’s configured correctly.
- Download MQTT Explorer from the project homepage.
- Open the app and enter your server details on the connection page, as shown below:
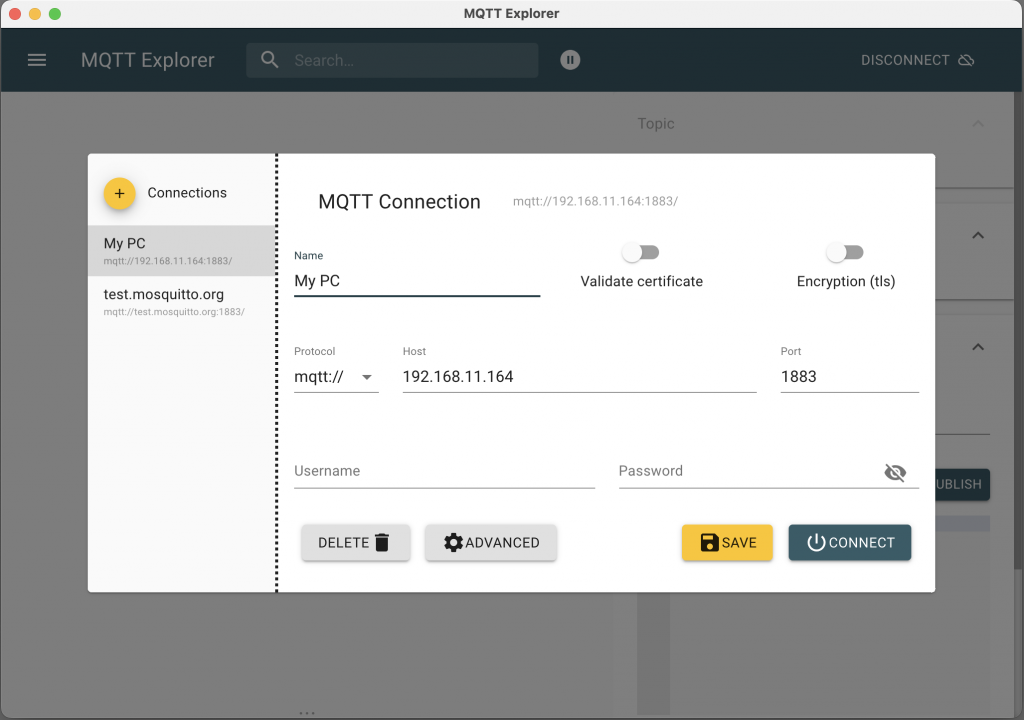
Make sure to uncheck “Validate certificate” (because our server isn’t using SSL), and enter your server’s IP address in the “Host” field. Leave username and password blank, unless you set up authentication when configuring your server.
Click Save to save your connection details fo rlater use, then click Connect.
- You’ll be presented with a tree view of all of the topics on your server. MQTT topics are hierarchical, and take the form of:
topic/subtopic/additionalsubtopic
By default, the only topics you’ll see are under the $SYS topic, which are metadata about the Mosquitto server itself that you can typically ignore. (But you’re welcome to browse them to see what’s there!)
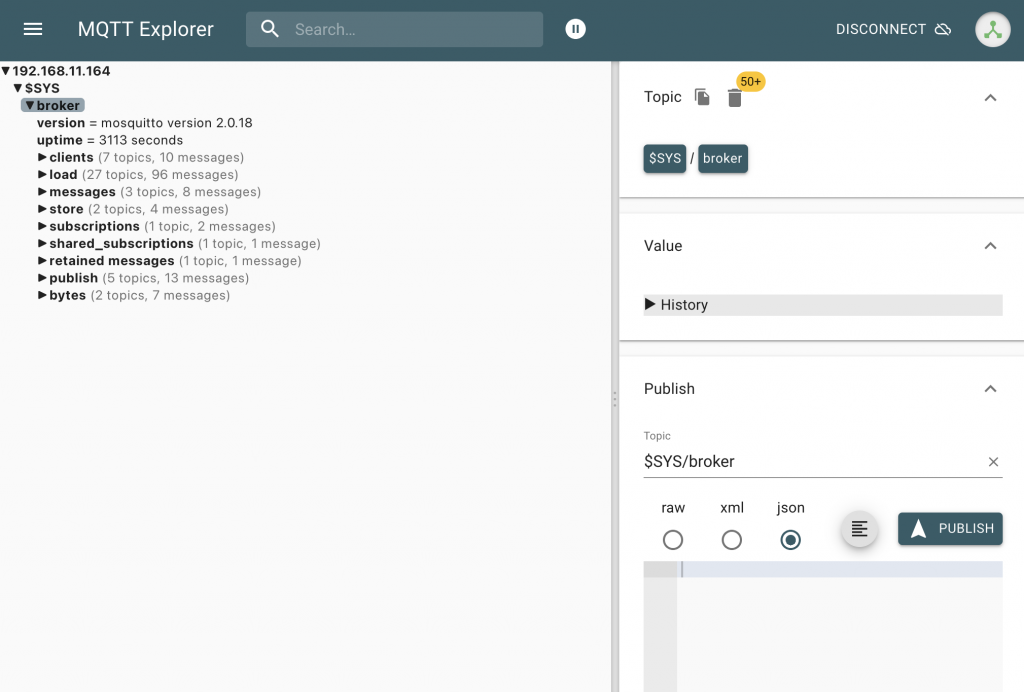
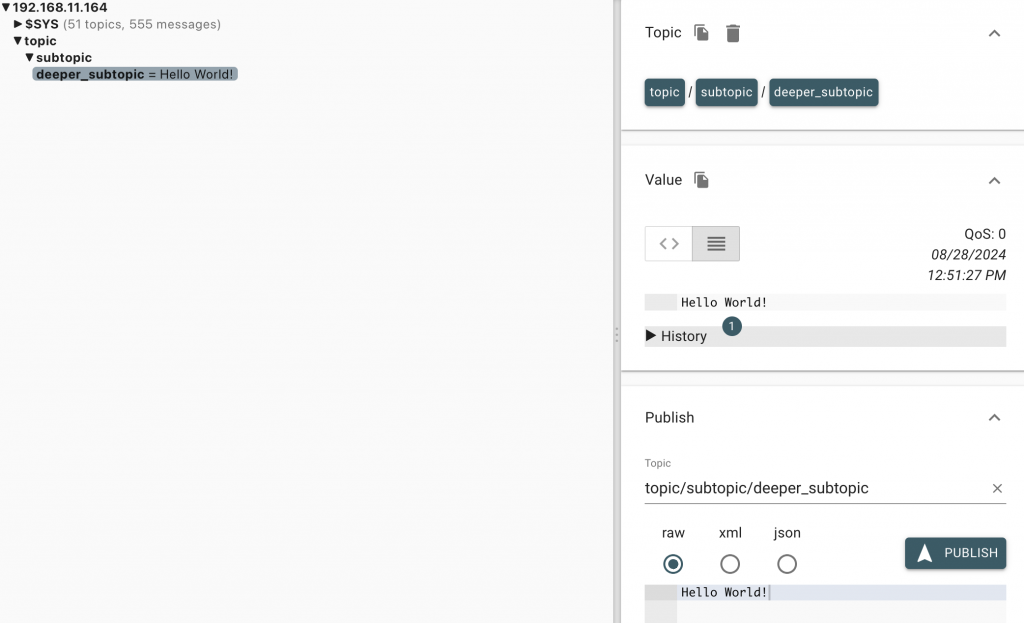
- Let’s send a test message to see how MQTT communications work. Under Publish/Topic, enter a topic with a few subtopics separated by a forward slash. Then, enter your message by clicking “raw” (meaning you’re sending just plain text) and typing in the box below. Then, click Publish.

- The message will show up in the tree view to the left, and you can click it to see more details.
Some important notes about MQTT messages:
Point in Time: MQTT messages are like a single individual instant message that comes and goes, so the server does not typically retain a log of past messages. Once they’re gone, they’re gone, so you need to stay subscribed to see what’s happening on the message bus. (There’s a special type of messages called ‘retained messages’ that breaks this a little bit, but that isn’t used by our controllers.)
No Payload Rules: There is no format required by MQTT for messages – you can send plain text, XML, JSON or any other format you like, as it’s just a set of bytes. Most people tend to use plain text or JSON, though; our controllers use plain text.
Distributed to All Clients: Once connected to the server, clients can subscribe to any topics they have security rights to subscribe to. All inbound messages to that topic go out to all clients. So if you subscribe from both your custom software and from MQTT Explorer, both should see identical messages coming from the server, making things super easy to debug.
- If you’d like to test these features, you can connect from a second copy of MQTT Explorer on a different computer. (That’s also a great way to verify your firewall configuration is working.)
When you connect, you’ll notice your previous test messages aren’t in the history list – but newly sent messages will appear on both computers instantly.
- The last thing to know about is subscriptions. Subscriptions control what topics are sent to your client, and can be used when connecting to a busy server with more information than your device is capable of processing.
Our controllers use this feature when connecting, because we only want to process messages intended for that specific device – so the controller will subscribe to only messages sent under their device name’s topic.
There are two wildcards that can be used in MQTT:
+ means “any topic in this level”
# means “any topic, and any subtopic”.
There’s also a quirky exception where topics that begin with $ are excluded from wildcards, but this isn’t used often in practice.
Some example subscriptions:
| Subscription | Meaning | Matches | Doesn’t Match |
| hello | The topic “hello” and nothing else | hello | helloworld hello/world other |
| hello/+ | All single level subtopics of hello | hello/world hello/there | hello hello/two/levels other |
| device/+/version | Subscribe to topics where + can be replaced by an arbitrary string | device/1234/version device/4567/version | device device/1234/status device/1234/version/subversion |
| # | All topics on the server that don’t start with $ | hello hello/world device device/1234/version device/4567/version | $SYS/version |
| hello/# | All subtopics of hello | hello hello/world hello/there hello/two/levels | helloworld other |
Sounds more complicated than it is! In most cases, on a single-game server, your code will just subscribe to #.
If you have a lot of data flowing, you may want a more scoped subscription, though; if you want to experiment, you can change the subscriptions MQTT Explorer uses in the Advanced connection settings. By default, it subscribes to # and $SYS/#:
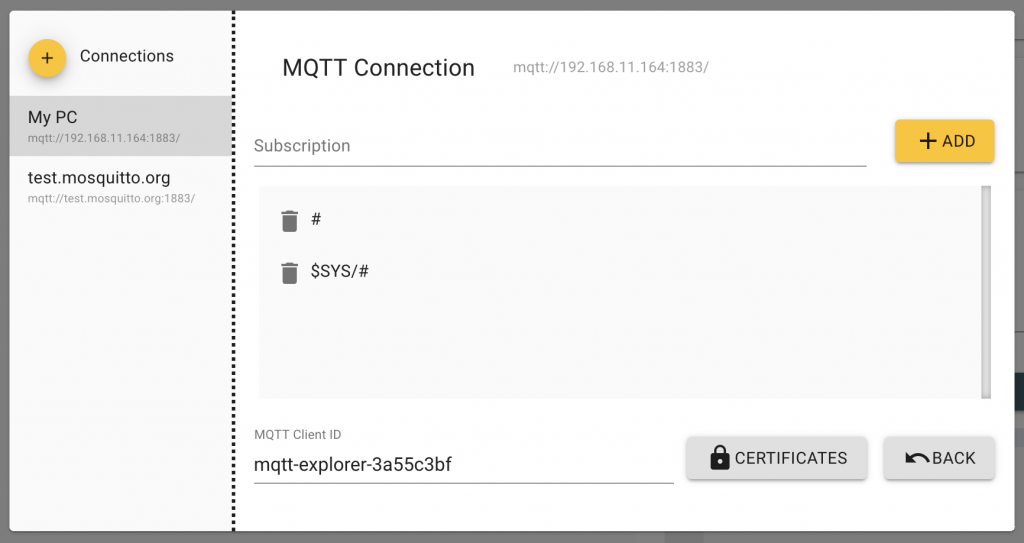
You’ll also notice a client ID here. This is needed to uniquely identify each client to the server, and is typically best chosen to be a unique ID.
Part 4: Set up your BAC to connect to your server
Setting up the controller to connect to your new MQTT server is simple:
- Install BAM from our site, if you don’t already have it loaded.
- Plug your controller into a wired Ethernet connection, then connect it to a 12V power source.
- Find the controller in the controllers list in BAM. It should take about a minute for it to appear on the network after startup. (If you have trouble, refer to our troubleshooting resources.)
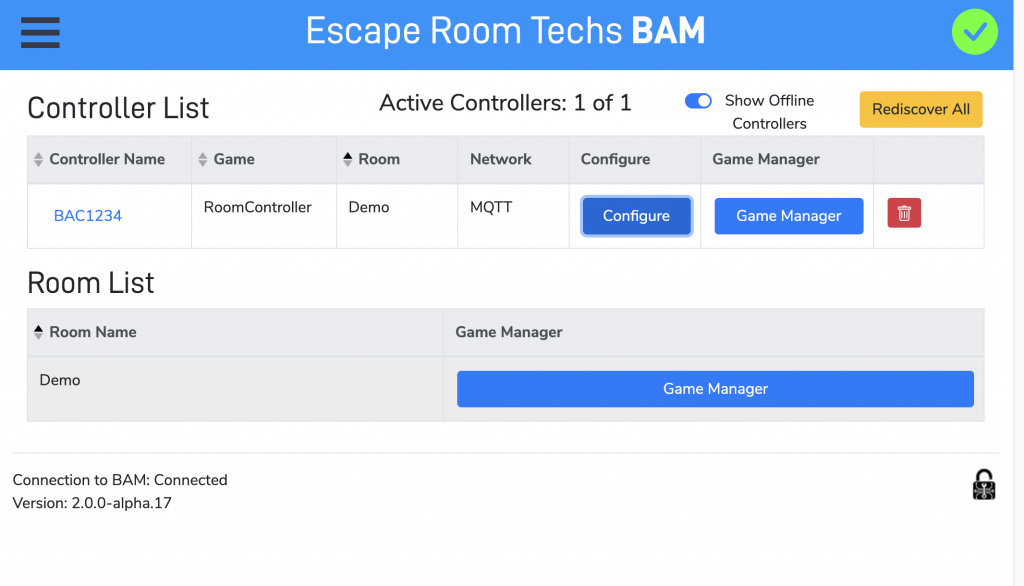
- Find your controller in the list and click Configure.
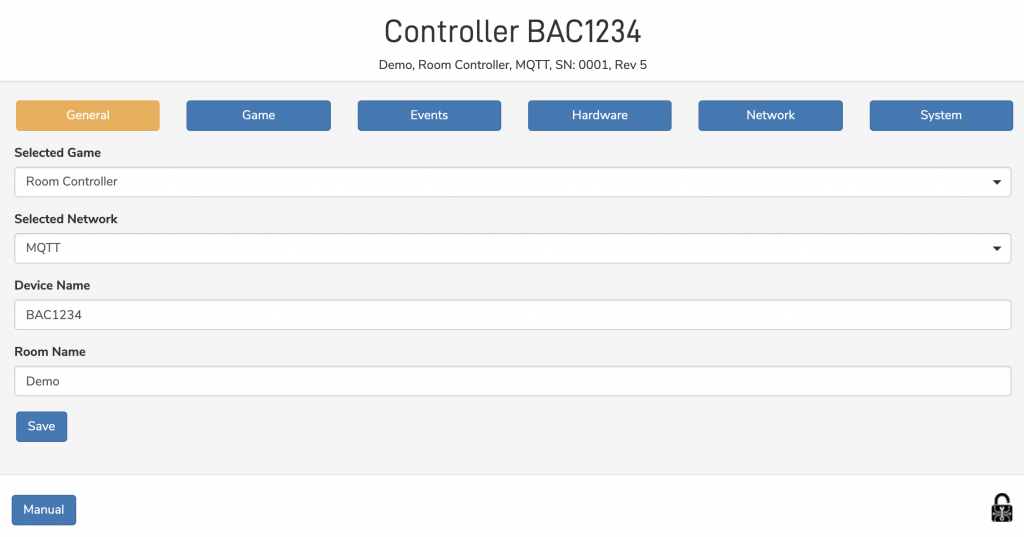
- Give your BAC a short, helpful name with no spaces, and set the Selected Network to MQTT. Click Save before proceeding to update the controller to the correct network type.
- Click the Network tab. The first information you see will be the controller’s own IP address – this is assigned by your router, and is shown just for your information.
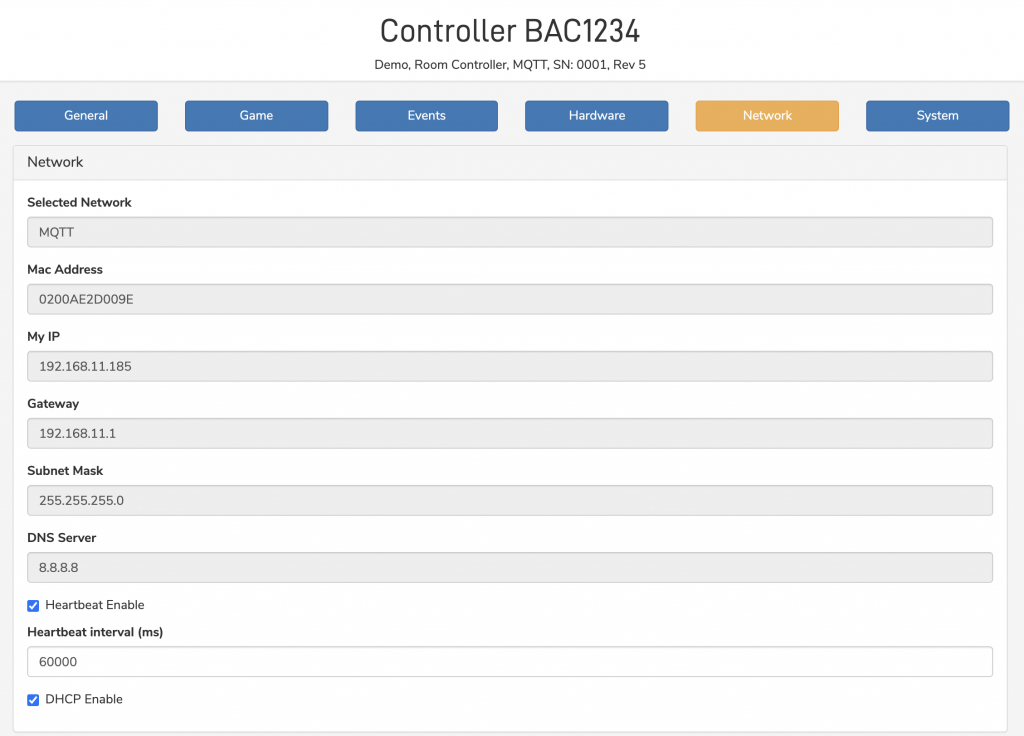
Scroll down to the MQTT settings. In this section, enter your MQTT server connection details you determined in the previous steps. When you’re done, click Save.
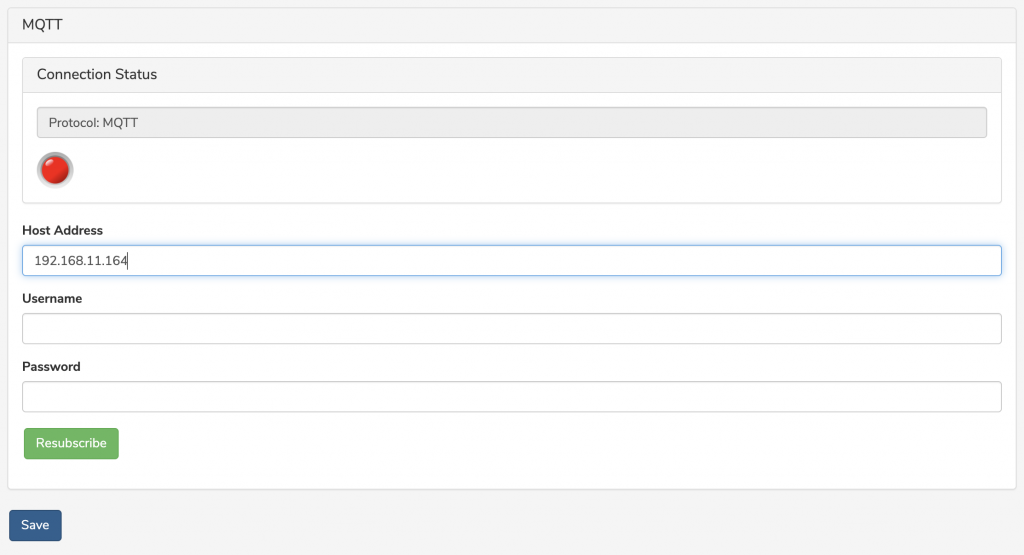
If your connection settings are correct and your server is configured to allow anonymous access with an open firewall, the controller should connect and the light will turn green. If it doesn’t, double-check the previous steps in this guide, verify that MQTT Explorer can connect correctly from a different computer than your server, and then reach out to us for assistance if you’re still stuck.

Once you’re connected, if you have an open instance of MQTT Explorer, you should see a burst of messages from the BAC listing all of the available topics and their default settings. As inputs on the BAC change, you will now see updates sent to the MQTT server in real time:

The full list of available commands is in the Master Command List. At this point, feel free to experiment with sending and receiving messages in MQTT Explorer – the full command suite is available that way, so you can conveniently test your controller independently from your code.
Part 5: Integrating with a C# application
Now we have our controller connected to our server, let’s integrate it with a simple C# Windows Forms application. We’ll use a library called MQTTNet.
- Open Visual Studio
- From the Project menu, choose Manage NuGet Packages. (NuGet is a tool for installing prepackaged libraries that add functionality to your C# program.)
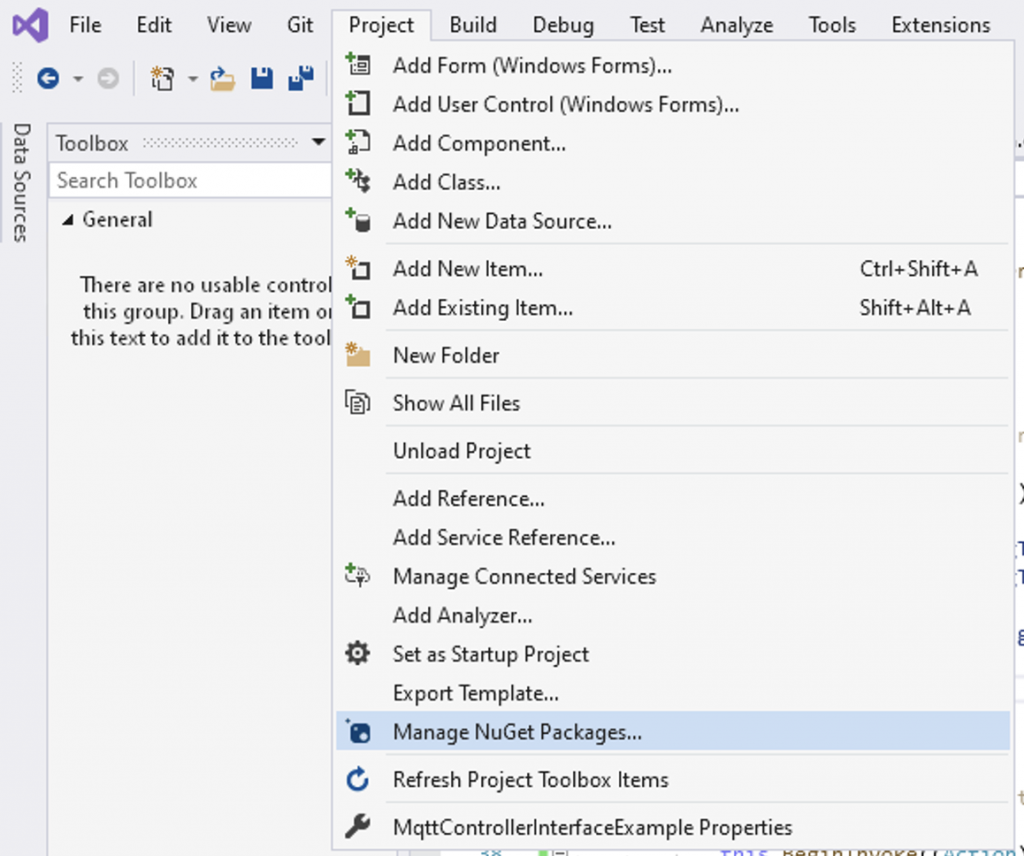
- Click the Browse tab.
- Search for MQTTNet. Select it from the list, then Install the latest version.
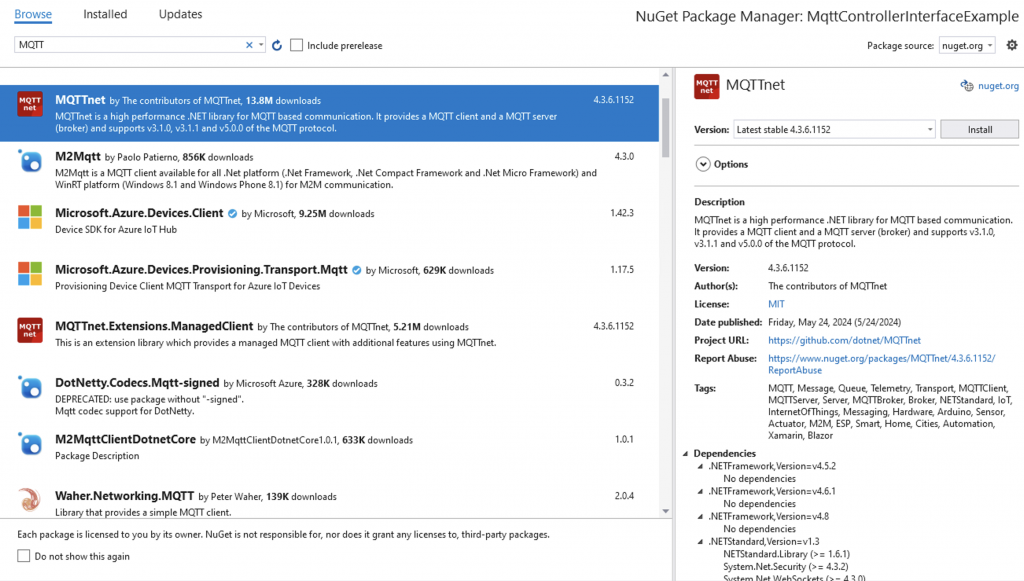
- If prompted, approve the changes to your solution.

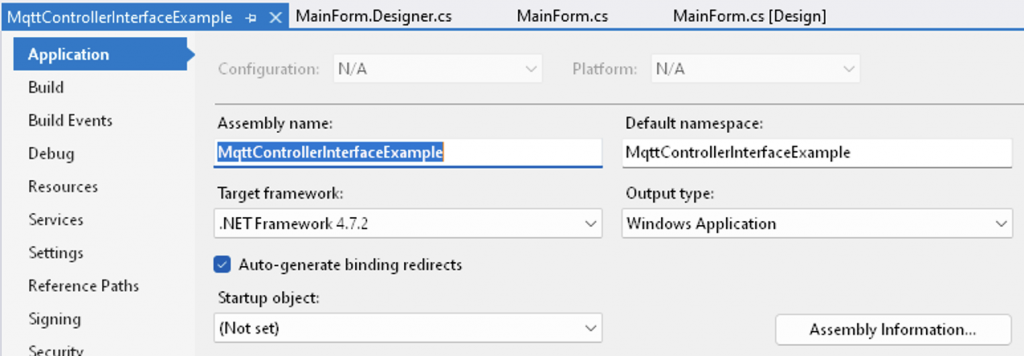
If you get a version error and the package won’t install because of a .NET Framework version mismatch, the best approach is likely to update the version of the framework you’re targeting with your app. Right-click your project, choose Properties, and open the “Target Framework” dropdown to update to the latest version with the same major version number. (This may cause compatibility issues with other libraries you’re using, so make sure to test everything before deploying after making any change to your framework version!)
When everything is installed successfully, you’ll see MQTTNet in the “References” list in your Solution Explorer:

Once the library is integrated, all that remains is to add it to your Using statements and add the necessary logic. We’ve published a sample to GitHub that acts as a full remote controller for the inputs and outputs of a BAC, demonstrating the use of MQTTNet in a C# application: https://github.com/escaperoomtechs/MqttControllerInterfaceExampleCSharp
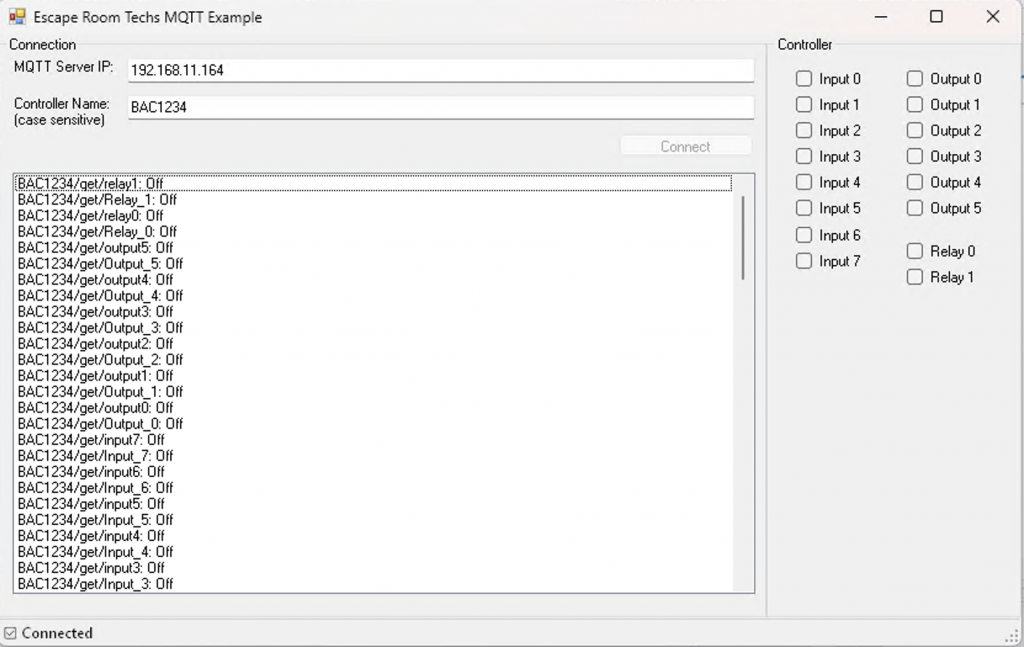
We also have an older sample that’s a bit shorter and simpler, focused only on reacting to RFID tag data from our FX205 RFID readers: https://github.com/escaperoomtechs/sample-rfid-mqtt
If you have any questions about the sample, please reach out to us anytime for assistance at escape@escaperoomtechs.com !
