The Sprite is a versatile audio and video player that makes a great companion for your BAC! There are two ways you can connect the Sprite:
Recommended Solution: Serial Control
With the help of an FX45 Expander and one of our I2C cables, slightly modified, you can gain full control over your Sprite through the BAC’s event system (and even via the network from a server package like M3)
Disconnect power to your BAC. Then, connect your FX45 expander to your BAC V. The FX45 plugs into the port on the right side of the BAC.
Make sure to install the expander with the connectors facing up, and pay careful attention to make sure all of the pins are aligned correctly in both rows of the connector as you plug it into the BAC. Some revisions of the BAC have a connector that is smaller than the one on the FX45, and you may need to double-check your alignment when installing it to ensure every pin is connected correctly.
Locate the special adapter cable we enclosed in your MedeaWiz Sprite box. If you did not receive a cable or purchased your Sprite separately, see below for instructions on creating your own cable – or contact us for information about obtaining a premade one. The technical name for this cable is “JST-PH to TRRS Minijack”, and it can be fashioned out of the adapter that comes with your Sprite and one of our I2C cables if needed.
Plug the completed adapter into the Sprite’s I/O port. (You may need to rotate the plug 90 degrees to avoid conflicting with the HDMI cable.)
Load your audio or video files on an SD card, then insert it into the Sprite. Name your files with a three digit number; 000 is the file that will always loop in the background when no other file is being played (and can be a black screen or silent sound file), while 001 and above are files to be triggered via the BAC. Keep the original file extension intact.
Power on your BAC and the Sprite.
Configuring the Sprite
Connect your Sprite to a monitor temporarily for this step if you are planning on using it for audio only.
Press the Setup button on the remote to enter the setup menu.
Change the settings as shown below:
Play Mode: Video Control Mode or Audio Control Mode (choose based on whether you are trying to control video or audio; this selection needs to correctly reflect the types of files you wish to play back.)
Control Mode: Serial Control
Baud Rate: 9600 bps
Address Mode: Do Not Use Addressing
Configuring your BAC
Ensure your BAC is running at least software version 1.10 before continuing. (Version 1.10 includes an important fix to looping file control for the Sprite.)
Click Configure in BAM to open the settings window.
Click the Hardware tab. Scroll down to the Sprite Player section. Check the enabled box, then click Save. Then return to the Sprite Player section, and ensure Hardware Serial is selected.
Now, you can control your Sprite from the BAC! Click the Events tab to add a new Sprite control command. Locate an event you would like to use to trigger a video. Select “Play Sprite Video” or “Set Sprite Loop”, depending on whether you want to play your file once or repeatedly. For settings, type the number of the file you’d like to play. Click Save, then click Trigger to test your newly modified event.
You can also perform these functions over the network by sending a message with the number of the file you’d like to play to BACNAME/set/playSprite or BACNAME/set/loopSprite .
Troubleshooting
Verify the FX45 is installed and aligned correctly with the BAC connector.
Make sure the Sprite is receiving power correctly.
Try playing your files using the provided remote and ensure they play correctly. If the Sprite can’t play the files via the remote, the BAC won’t be able to either.
Ensure your cable’s pin connections matches the section below.
Addendum: Creating a Sprite Cable
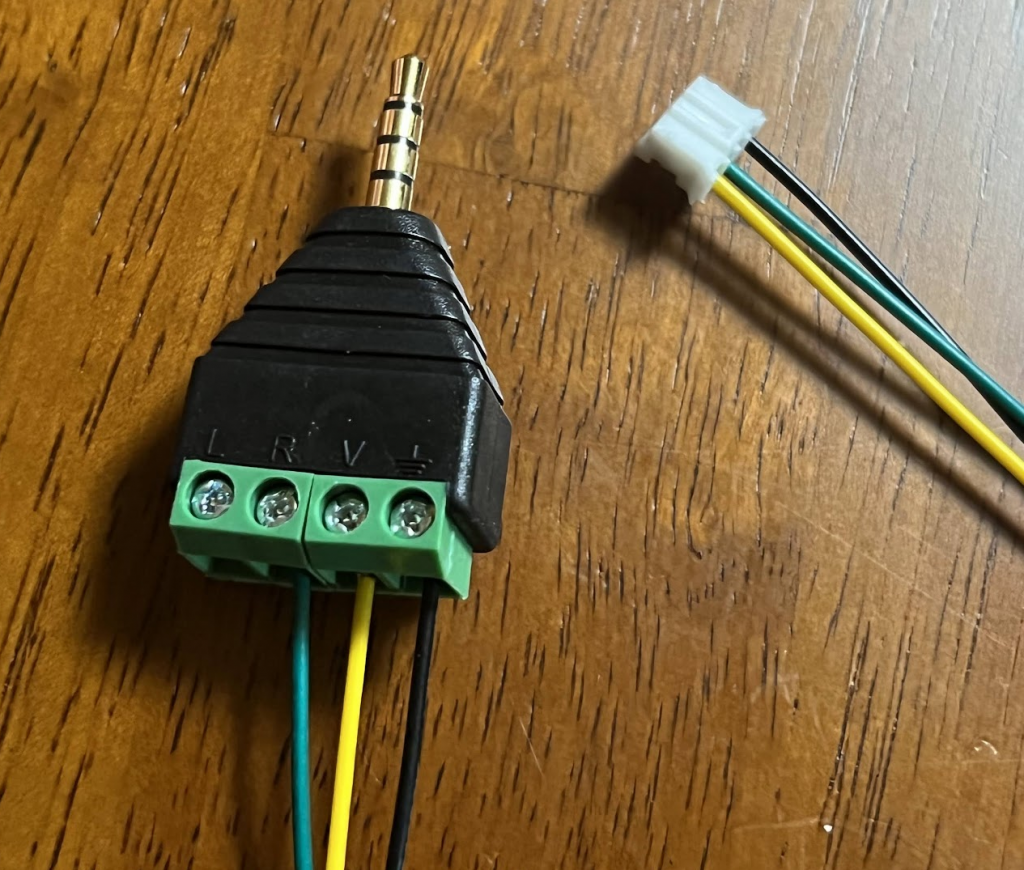
Obtain a JST-PH 2.0″ pitch, 4 conductor cable from our store or another vendor.

Plug one end of the connector into the Serial connector of the BAC. Then, cut the other end off of the cable and strip about 1/4″ of insulation from each of the four wires.
Find and identify the screw terminal connector that comes with your Sprite. (If you have misplaced it, you can purchase a replacement from Amazon.)
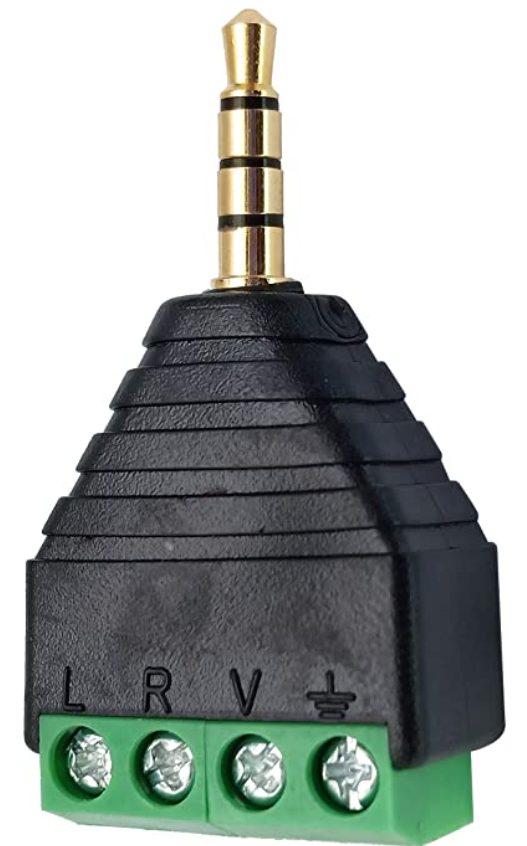
It contains four screw terminals- L, R, a third labeled blank or V, and Ground; these correspond to the tip (1), ring (2), ring (3), and base (4) pins of the connector.
Identify the wires coming out of the FX45 by the silkscreened indicator on the board. On newer revisions of the FX45, each pin is labeled. On older revisions, look for the numeral 1, identifying the side that is Pin 1, and then count the other pins in sequence going from left to right.
Make the connections as shown below:
BAC Serial Pin 1 (RX) <> Sprite IO Ring (“V”/blank, 3)
BAC Serial Pin 2 (TX) <> Sprite IO Ring (“R”, 2)
BAC Serial Pin 3 (V+) <> Do not connect
BAC Serial Pin 4 (GND) <> Sprite IO Base (Ground)
You will not connect any wires to the L (1) port of the Sprite connector.

Plug the completed adapter into the Sprite’s I/O port. (You may need to rotate the plug 90 degrees to avoid conflicting with the HDMI cable.)